Yes! This is Carolyn! Carolyn also paints the best silkies! Yes, I said paints! She hand paints some extra wonderful silkies! I received one from her in the mail last week. It was a "thank you" for my help. It is just beautiful!! After the rough last couple of weeks that I have had this was one of the best up lifters that I have received!
Carolyn, I just want to say thank you for the gift!! I LOVE it!! I also know that I will enjoy it for years to come, and I will never forget you!
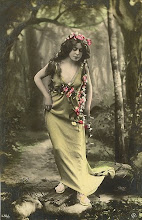
Here it is the beautiful Forget-me-not silkie!
 I wanted to use it on a special project. One where I could see it all the time. One that others would see this beautiful gift and be able to enjoy it! So the thought process was on!
What to do......What to do.........What to do............
As I was out yesterday on my round of yard sales and thrift stores I happened on that special project! A picnic basket!! I found it at the Methodist Church yard sale for $1.00. They were trying to wrap up the sale when I got there and had everything half off! Here it is the picnic basket that over the next few weeks that will be transformed into that special something! My brand spanking new sewing basket!!!

This particular picnic basket is plastic. I don't know if I would be able to spray paint it or not. Does any one have any suggestions?? I don't mind leaving it this color though. Although it would be so nice to have it a different color.............

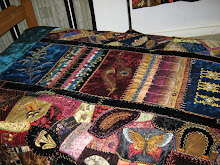
As y'all can see the top is flat, it I do believe it is a thin "press board". Perfect for the method of attaching a CQ top, using the method that I put the tops on the CQ tins that I made for the CQI swap.

So..... I traced the top on to my muslin material.

Then using my silkie as a color guide I pieced together my top to embellish. I am seeing SRE flowers. I want to practice ones that I found to do on Simona's landscape block on my basket top. I also want to do some of those cute daisy's that I embroidered on Rita's block! Roses of course lots and lots of roses! I can just picture it in my mind!!!!
 Now here is the hard part. How to finish off the inside of the basket! Below is a picture of the inside of the basket. If y'all would please leave me a comment on how to finish the inside. I would welcome any and all suggestions!
TTFN


3 comments:
Very beautiful your gift. I already visit yours friend's blog. Your sewing basket will be fantastic.hufs from Brasil
Lyn:
I'm so glad you like the little forget-me-knots! I really enjoyed painting them for you.
Thank you so much for all of your help with my blog!
Giant hugs,
Carolyn
I think your picnic basket will be lovely when you have done it! Why not just sew a lining and attach it around the inside rim with trim? Sort of like a purse lining? Not very imaginative, my idea, but then it is morning! lol
Hugs,
Kerry
Post a Comment