Let's talk about putting blocks together. When I learned how to put together crazy patch blocks I was a young woman and my grandmother taught me. To begin with she told me that they were very easy. Which to find out they really are easy to put together. She said start with a piece of fabric in the middle and go around and around until the block is filled. A little vague right? I did figure out how to put them together a little better in my old age! There are times that I put together a block just like she taught me. Is it wrong? I don't think so. There are so many crazy quilts out there where the maker did not follow today's rules or even yesterdays rules, they just picked a piece of fabric and put it in the center of the block and just sewed around and around until the block is full. Many antique crazy quilts follow a pattern that is not crazy patched, they are patched in some of the traditional quilt patterns of the day with some of the most wonderful stitching that has ever been seen.
There are many ways to put crazy patch blocks together. As many as there are teachers out there. Even my rules and methods will differ from others. Many teachers will get down to business with you and teach you right. Others will tell you there are no rules. Well there are a few rules that you will need to know in order to make your stitching easier.
So lets take a look at piecing a block.
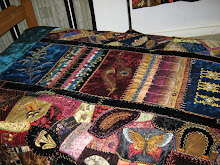
First I figure out how big I want to make the block. Lets say I want to make a quilt out of blocks 8x8inches. I will measure out a square block on "backing fabric" that is 9x9 inches. (Backing fabric by The Lions definition is the base fabric that you will crazy piece on.) After I cut it out I will take my ruler and measure an inch into the block and then draw my "guideing lines". To the Lion guide lines are lines that are put on the block so that I can stitch a little further out so that when the blocks are stitched together there are no gaps on the block that are bare of stitches. (When we get further along in the year you will see what I am talking about when I start putting this quilt together.) As you can see from the picture below I have already done this with my backing fabric

Now here is where the putting together the block gets more interesting. You need to find a small piece of fabric to put in the center of the block. It should be anywhere between 2 to 3 inches in diameter. Now lets talk about the center piece. I usually start with one that is the shape and color and texture that "tickels my fancy". This goes back to my grandmother and her put a piece of fabric in the middle and sew around and around. Some times this piece has four sides sometimes it has five sides.
Lets now talk about sides and today's standards. Today and maybe even in my grandmothers day the standards say start out with a middle piece that has five sides. As you can see from all my pictures I sometimes start out with a four sided piece. That is my bad habit from my grandmother. Is it wrong? I am not going to debate that but for all purposes in today's CQ you will need to start out with a five sided piece. One day when we do have CQ standards and guidelines for show quality quilts they more than likely say that your middle piece needs to have five sides. So DO NOT get into my bad habit in picking up a piece of fabric with four sides. Start out right and choose one with five sides.
After it is in the center of the block that is where you find another piece of fabric and sew it on the edge of your center fabric. You can see here in the picture what I am talking about.

As you follow the pictures you can get the idea on how you should just keep sewing around the center piece. Just like my grandmother said just get a piece of fabric and put it in the middle and sew around and around until you fill up the fabric. She was so very right in that description even with todays standards.

Now let me get you to put out the idea that you have to search through your fabric pile or you have to cut "just the right piece" of fabric. You can find the fabric in the next color and texture that you want and sew it on the next edge. You can find a larger piece of fabric to sew on the block. I actually prefer to find a larger piece of fabric to sew on. It helps to keep "gaps" out of the fabric. As you can see from the picture below where I did sew a larger piece of fabric then I found another piece and stitched it onto the block over the top of it.

Now here is the trick every beginner needs to know.........take you scissors and cut off the excess fabric at the seam. You can see what I did from my picture below.

As you can see from the picture below the excess fabric has been cut off and the pink piece of fabric is ready to be pressed into place. The orange piece takes on a whole new shape after this process.

The excess fabric needs to be cut off. If you are asking why, the reason is you have the backing fabric and the top fabric to go through when you start your embroidery. If you leave excess fabric you will have that layer to go through also. This makes it rough when pulling your needle and floss through the block. It also makes it harder to get your stitches the way you want them. Another reason is some fabrics you can see straight through. Like that orange piece that I cut off, you could have seen that straight through the pink piece.


Turn over your block and with a rotary cutter cut off the excess fabric from around your base block. As you can see from the picture below my guide lines. After you cut the excess fabric off you want to stitch those guide lines. You can do it by hand or by machine. I stitch them by machine.

After it is all done you have a perfect block for stitching. As you can see there really are just a few rules in piecing a block. They are there to make things easier on you and your stitching.
For my next post you are going to find out what you are going to do with the composition book and colored pencils!
Please if you have any questions on the post just ask. I will be happy to answer them. You can either post them here on the blog or email me privately.
TTFN
The Lion