~Place a CD on the top of one of the 6x6 squares.
~With your sharpie make a circle using your CD for a pattern, also put an X in the middle hole to mark the middle of your circle.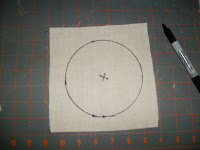
~Do the same with the other 6x6 square.
~Turn over your 6x6 square.

~Start piecing your square.

~When you are finished piecing baste a line around the drawn circle.

~Do the same with your other square.

~ Now you are ready to embellish. Embellishing within the basted circle embellish as you would any CQ block, using embroidery floss to buttons and beads. Just remember that the possibilities are endless!!

~After embellishing place one of the two squares face down. Place one of the Cd's in the already drawn circle.


~Cut about one half inch to one inch around the CD.


~After you do that take the thread and baste around the outer circle so that you can gather the material around the CD.


~ When you are finished getting the block ready to gather, before you put in the CD, you want to put in the batting.


~After the batting put in the CD, pull the thread so that the material gathers around the CD. At this point the CD should look kinda like a giant yo-yo. You will do the same with the other CD.


~After gathering the material around the Cd's and securing it. Put the Cd's together with the wrong sides facing each other, and the embellished sides facing out.

~With the perle thread you will sew the 2 Cd's together with an blanket stitch.

~After completing one side with the blanket stitch you will need to turn them over and do the blanket stitch on the other side.

~Pull out your basting lines and now you have a complete pin keeper.


ENJOY!![]()