This afternoon I found out that I had won the prize for a game that I had been participating in on a yahoo group. I was so excited I just could not stitch! So I had decided to "play" with something that I had been meaning to "play" with.
The freezer paper silkies! This is where you take your selected fabric and iron it onto freezer paper and then you can print out your silkies. I am here to tell all who have not tried this that it really works!!!
Here is how I did it:
First I gathered the fabrics that I wanted to experiment with. I found some cotton batiks, yellow and pink. I had some silk shirts that I found at the local thrift store.

 One is a pure white and the other has a blueish tint to it. The pure white one is a thicker fabric than the other.
I found an old pink dress, this dress the under skirt is pink satin. I thought I would at least work up one sheet of satin just to see how it does. As you know satin some time just likes to "run" ink. A little ink spot on satin............. Need I say more??
 I ironed all the fabrics on to the freezer paper. You can get rolls of freezer paper in the grocery store. I think that I paid $1.99 for my roll.
 Then I took a piece of printer paper and cut the "freezer fabric" to size so that I could send it through the printer.
 Here is all of the "freezer fabric" that I wound up with. Each one is cut to the size of printer paper so that they will go through that printer with no problems.
The cotton batiks.
 The two different silks.
Here is the one lonely satin sheet I made!

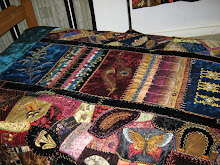
I printed on the satin one first. I was so curious! Look! No runs! It turned out wonderful! This opens up all types of possibilities. I have white satin and a mint green satin that would make nice silkies.(If you don't know how to print silkies I have a simple tutorial here on my blog. It is the post before this one.)

Then of course the silk came next. It printed up real well also.

Now the cotton batiks. I wish that you could see them up close! These make beautiful silkies!


I cant wait to get more batiks and "play" with other colors!
Pictures just do not beat seeing these in person! My suggestion is to try playing with this silkie printing method yourself and see what you come up with. It just might be something that you will love!
TTFN


8 comments:
Your new look is fabulous...I absolutel love pansies...So perfect..Also, thank you for the tutorial on the freezer paper and silk...I have done this on cotton but wasn't sure if I needed to do anything to the fabric prior to doing a print on silk...This is great to know..Thank you Lyn...hugs, Skye
Hi Lyn,
I agree with Skye,Your new page is beautiful,clear to read and as always so interesting!
Thank you for the tutorial on this printing. I tried doing the printing a few weeks back and got paper 'Jam''in the freezer ..resulting in 2 screaming Male's in the house ( a cup's of hot drink and food soon sorted it out lol!!!)
Very interesting that batik printing..looks so much more antique if thats the word to use?
I can dye Batik style myself as did a class...so this gives me ideas for us.
Hugs from Pam
What fun! Looks like you had a great time with the silkies. I would never have thought of using batik but now I can't wait!
Thanks Lyn!
Hugs,
Kerry
I love your new look! And I love those batiks especially with the prints on them! What a great idea!!
Wow Lyn, The effects are beautiful. And your site looks awesome too!
Wow Lyn, The effects are beautiful. And your site looks awesome too!
Love the new look, so much better than the spots before my eyes of before, lol. Pansies are a personal favorite too. Loved the silkie tute, especially that the satin worked. Looking forward to working with you on StitchMap.
These all turned out beautifully! One of these days...maybe I will get time to use your tutorial on silkies!
Thanks for sharing,
Susan
Post a Comment