Karrin, had chosen as a inspiration a water color she had painted. I forgot to get a scan of her inspiration picture for all to see. Maybe she will post it where all can see it. For her beautiful blocks I decided to do burned silk trees. The following blog post is the process that I used to come up with the trees.
Here is a list of the items that I used for this project:
A wood burning tool. Pictured here:
A quilters 6x6 inch ruler
Blank printer paper
Brown silk for the tree trunks
A marker
Rotary cutter
Scissors
Brown silk floss
Brown silk floss
Two different color green silk ribbon
**************************************************************
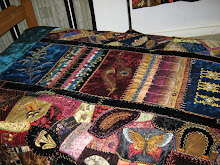
I started with Karrin's Landscape blocks. Pictured here:
Side 1 Side 2
Side 2 Observing the blocks I saw that she had added a house to side one and a arbor to side two. With these items added to the blocks they helped to determine the scale in tree height.
Using the 6x6 square I measured the size of the two pictures on the blocks.

 The measurements for the house and arbor are 3 to 3 and 1/2 inches. You will want the trees to be a little bigger then 3 inches for the closer trees and a little smaller then 3 inches for the trees in the distance.
By putting the 6x6 inch square on a piece of clean printer paper I measured out the 3 inches and 3 and 1/2 inches and marked out the measurements with the marker.
This picture shows measuring the 3 to 3 and 1/2 inches:

This picture shows the paper marked with the measurements:

After marking the 3 and 3 and 1/2 inches on the paper I then draw out the trees that I am going to use as patterns when cutting the silk.
When drawing trees to applique I always draw the main branches the smaller branches can be added after the tree is appliqued to the the block. I always use the appropriate color floss for those smaller branches.
This picture shows the patterns for the trees to be cut out. As you can see the trees are drawn around the 3 to 3 and 1/2 inch scale that was measured from the blocks.

After drawing out your trees they need to be cut out.
******************************************************************
Now you have templates to use to cut out the silk trees.
 Take your tree templates and lay them on the silk that you are going to use for the tree trunks.
Take your tree templates and lay them on the silk that you are going to use for the tree trunks.
*********************************************************************
Now I have little tree trunks. I photographed them on the white paper so that they can be seen better.

*********************************************************************
Now they are ready to be "burned" using the wood burning tool. In the picture below I am using a COLD wood burning tool to show you how to just burn around the edges.
***If you hold your silk to burn it. I would suggest using tweezers to hold the silk while burning to avoid burning your fingers.***
After burning the edges of your silk trees you can place them on the blocks for appliqueing.
The next two pictures shows how I place the trees on Karrin's blocks.

 After pinning down the tree trunks I took one strand of floss and straight stitched around the edges of the trees. When you are using the burned silk you do not have to turn the edges under to applique them to your block. You want the burned part to show. After all that is why we use the burning process!
For the leaves I decided to use silk ribbon. I used 4mm and 7mm Isle Green from Hand Dyed Fibers and 4 mm Moon Creep from Hand Dyed Fibers.
Here are the finished trees:


The blocks are now on their way to the next stop in the RR. I hope that Karrin enjoys what I added to her blocks!
If you have any questions please feel free to email me. The link button is in the sidebar of my blog.
TTFN


8 comments:
Hello Lyn, thanks for the explanation. Today I post in my blog about the prize I won,and the gifts that you send me. Hugs from Brazil
Lyn the trees are absolutely wonderful, and I love them. I need to get one of those burning tools. I have been using candles, and sometimes that takes too much off. Thanks for the tutorial!
Lyn, that is a really neat tutorial. Thanks! And thanks for the silkie of Mary P. Can't wait to put it in a block! Ruby
Great tutorial Lyn! Thank you so much!
Excellent tutorial on burning silk..I look forward to giving it a try...Thank you for taking the time to do this for us..hugs, Skye
This is a very detailed and great tutorial, thank you! Your explanation of the 'to scale' info was also very educational. I love to read your blog, there is always something inspirational here.
Shari
Amazing! I do not quilt, but seeing your work and talent stirs my heart to desire old fashioned quilting parties.
Your blog is very beautiful. May God bless you for being a blessing to others.
Andrea
Wonderful explanation Lyn - thank you for sharing! I have been wanting to try this and now I feel like I will be able to using your instructions.
Hugs,
Kerry
Post a Comment