Saturday, May 30, 2009

Burned Silk Trees

Happy Saturday to everyone! I have been busy for the past week or so working on a landscape RR block.........well blocks. I had Karrin's tea cosy. The RR that we are in is a one block RR but since she wanted a landscape tea cosy she sent both the front and the back. I decided to do the trees on it and so I added in the end one tree to the back and three trees to the front. I thought that it would make both pieces uniform all the way around no matter what someone else might do on her blocks.

Karrin, had chosen as a inspiration a water color she had painted. I forgot to get a scan of her inspiration picture for all to see. Maybe she will post it where all can see it. For her beautiful blocks I decided to do burned silk trees. The following blog post is the process that I used to come up with the trees.

Here is a list of the items that I used for this project:

A wood burning tool. Pictured here:


A quilters 6x6 inch ruler
Blank printer paper
Brown silk for the tree trunks
A marker
Rotary cutter
Scissors
Brown silk floss
Two different color green silk ribbon

**************************************************************

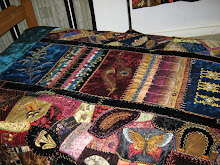
I started with Karrin's Landscape blocks. Pictured here:

Side 1Side 2
Observing the blocks I saw that she had added a house to side one and a arbor to side two. With these items added to the blocks they helped to determine the scale in tree height.


Using the 6x6 square I measured the size of the two pictures on the blocks.

The measurements for the house and arbor are 3 to 3 and 1/2 inches. You will want the trees to be a little bigger then 3 inches for the closer trees and a little smaller then 3 inches for the trees in the distance.


By putting the 6x6 inch square on a piece of clean printer paper I measured out the 3 inches and 3 and 1/2 inches and marked out the measurements with the marker.

This picture shows measuring the 3 to 3 and 1/2 inches:

This picture shows the paper marked with the measurements:

After marking the 3 and 3 and 1/2 inches on the paper I then draw out the trees that I am going to use as patterns when cutting the silk.

When drawing trees to applique I always draw the main branches the smaller branches can be added after the tree is appliqued to the the block. I always use the appropriate color floss for those smaller branches.

This picture shows the patterns for the trees to be cut out. As you can see the trees are drawn around the 3 to 3 and 1/2 inch scale that was measured from the blocks.

After drawing out your trees they need to be cut out.
******************************************************************
Now you have templates to use to cut out the silk trees.
Take your tree templates and lay them on the silk that you are going to use for the tree trunks.

Using my rotary cutter I cut the tree trunks out of the brown silk.
*********************************************************************
Now I have little tree trunks. I photographed them on the white paper so that they can be seen better.


*********************************************************************

Now they are ready to be "burned" using the wood burning tool. In the picture below I am using a COLD wood burning tool to show you how to just burn around the edges.

You will want to burn your silk on a heat tempered glass plate, or I have been using a small cookie sheet on a folded bath towel. Using these items will help protect you from burning your work surface. Most importantly will help keep you from burning your house down. Remember you will need to protect your stash!

***If you hold your silk to burn it. I would suggest using tweezers to hold the silk while burning to avoid burning your fingers.***

After burning the edges of your silk trees you can place them on the blocks for appliqueing.
The next two pictures shows how I place the trees on Karrin's blocks.

After pinning down the tree trunks I took one strand of floss and straight stitched around the edges of the trees. When you are using the burned silk you do not have to turn the edges under to applique them to your block. You want the burned part to show. After all that is why we use the burning process!

For the leaves I decided to use silk ribbon. I used 4mm and 7mm Isle Green from Hand Dyed Fibers and 4 mm Moon Creep from Hand Dyed Fibers.

Here are the finished trees:


The blocks are now on their way to the next stop in the RR. I hope that Karrin enjoys what I added to her blocks!

If you have any questions please feel free to email me. The link button is in the sidebar of my blog.

TTFN

Monday, May 18, 2009

Teaser Answers And Winners

Here are the answers to the blog teaser:
1:
a) a Bit/small part
b)The Silver King

2:
a)The Warrens of Virginia
b) William C. DeMille
c)Cecil B. DeMille

3:
a)United Artists
b)Any famous partner with the most famous being Charlie Chaplain
c)Academy of Motion Picture and Sciences
d) Any of the 36 Founders would have been right

First Bonus Question:
a)meat cage
b)Paris

Second Bonus Question:
a)Anna Beth Sully
b)Navy
c)Captain
d)6 citations


The winners are:
The squishie winner is:
Susan R.

The winner of the 2 silkies is:
Ann F.

Winner of the first bonus question is:
Skye

Winner of the second bonus question is:
Connie

*******************************************************
I had had so many ladies who came close to winning the squishie before Susan won it I thought that since I had 2 silkies of Mary Pickford going out to the first and second place winner I will send out one silkie to each lady who participated in the teaser this month.

The ladies who will be receiving one silkie are:
Becky
Wanda
Kerry
Amy
Ruby

--Ladies I will need addresses please email me your snail mail address.

Thank you for stopping by my blog!

TTFN

Saturday, May 16, 2009

"Catch My Star Blog" Teaser For May

This blog teaser is for a lady that I do not have an original cigarette silk for. But she is being added to my "Catch My Star" quilt anyway. Mary Pickford WAS the original celebrity, back in a time where men ruled she came out on top! From reading about her she had a drive and determination that was a force to be reckoned with! I hope you enjoy learning about her as much as I did.

Teaser Questions:

1) What was the very first acting job that Mary Pickford had? What was the name of the play?

2)What was her very first Broadway role? Who wrote the play? Who was his famous brother?

3)What was the name of the film studio that she helped to found? What famous person was the co-founder of the studio?
What famous Academy did she help found? Name five other founders of this Academy.


First bonus question:

Mary Pickford was the first "mega star"! Tom Cruse and Michael Jackson have nothing on this lady!

What was Mary Pickford locked in to keep fans from hurting her? In what city was this incident in?

Second bonus question:

Mary Pickford was married to Douglas Fairbanks. She was not the mother of Douglas Fairbanks Jr. Who was Douglas Fairbanks Jr.'s mother?

Douglas Fairbanks Jr. Served in WWII. What branch of the service did he serve in? What was his rank? How many citations did he receive?

************************************************************

My Prizes are as follows:

The first person to get all the teaser questions right gets a squishie loaded with goodies plus a silkie of Mary Pickford.

The second person who gets all the teaser questions right gets a silkie of Mary Pickford.

The bonus question's:

Bonus one right gets a CQ pin keeper.

Bonus two right gets a CQ pin keeper.

Please email me the answers! glynpg@yahoo.com

Good Luck Ladies!!

TTFN

Wednesday, May 13, 2009

Karrin's Birds And Bees RR Block

Here it is! I finished Karrin's Birds and Bees RR block! Through no ones fault I had received this block late so it is a little late getting sent off to the next stop. It will be on the way in tomorrow's mail.

Here is a picture of what I did:

Debby had used dark colors in the block particularly that beautiful red rose seam treatment! So I took the red and brought it up to the top of the block so it would not look lopsided. I gave Karrin a spider web, as a garden theme would not be complete without one. Every garden has a spider web! The seam treatments that I worked on the block I wanted to make like one of my favorite flowers. I call it the flame flower. I am not quite sure what the real name of it is but it is beautiful! I could not resist making a feather stitch seam treatment. On top of it all the SRE daisy's!

Now here is the kicker for this one. When I went to my monthly N' Stitches meeting Debbie H brought her new Di Van Niekirk book. In this book the author had a SRE flower that used stamen. I saw that and I thought that the technique used would look mighty pretty with these flowers. I read the directions at the meeting and came home and got out my stamen and worked them into the block. These flowers are beautiful! I wish that everyone could see these up close!

I also added the red butterflies and to pull some of the pastel colors down into Debby's corner I took out my new Sassa Lynne threads and made a chain stitch row right underneath the Beautiful red roses.As I received this block late and it did take me a little while to work my contribution into Karrin's lovely block..............
When you receive a block late do you rush through the block so that it can be sent on in time for the round or do you take your time to give the block owner your best work??
As you can see from Karrin's block my feelings on the subject. Karrin and everyone else deserves your best work, no rush jobs! So my apologies for holding up this RR. I am hoping that Karrin likes what I have added to her block!
Please, feel free to leave a comment on your feelings!
TTFN

Sunday, May 10, 2009

Happy Mothers Day

Here is to a happy Mothers Day to ALL!

From The Quilting Lion.

TTFN

Thursday, May 7, 2009

Silkie Winners


Announcing the winners of the silkie draw! Each lady gets one of these four silkies. My darling little Lora put her magic little fingers into the bowl and drew out four names.

The winners are:

Skye

Kerry

Pam

Connie

Ladies please email me and make sure that I have your addresses!

TTFN

Saturday, May 2, 2009

An Afternoon With Silkies

This afternoon I found out that I had won the prize for a game that I had been participating in on a yahoo group. I was so excited I just could not stitch! So I had decided to "play" with something that I had been meaning to "play" with.

The freezer paper silkies! This is where you take your selected fabric and iron it onto freezer paper and then you can print out your silkies. I am here to tell all who have not tried this that it really works!!!
Here is how I did it:
First I gathered the fabrics that I wanted to experiment with. I found some cotton batiks, yellow and pink. I had some silk shirts that I found at the local thrift store.

One is a pure white and the other has a blueish tint to it. The pure white one is a thicker fabric than the other.


I found an old pink dress, this dress the under skirt is pink satin. I thought I would at least work up one sheet of satin just to see how it does. As you know satin some time just likes to "run" ink. A little ink spot on satin............. Need I say more??

I ironed all the fabrics on to the freezer paper. You can get rolls of freezer paper in the grocery store. I think that I paid $1.99 for my roll.

Then I took a piece of printer paper and cut the "freezer fabric" to size so that I could send it through the printer.


Here is all of the "freezer fabric" that I wound up with. Each one is cut to the size of printer paper so that they will go through that printer with no problems.
The cotton batiks.
The two different silks.
Here is the one lonely satin sheet I made!

I printed on the satin one first. I was so curious! Look! No runs! It turned out wonderful! This opens up all types of possibilities. I have white satin and a mint green satin that would make nice silkies.(If you don't know how to print silkies I have a simple tutorial here on my blog. It is the post before this one.)


Then of course the silk came next. It printed up real well also.


Now the cotton batiks. I wish that you could see them up close! These make beautiful silkies!


I cant wait to get more batiks and "play" with other colors!
Pictures just do not beat seeing these in person! My suggestion is to try playing with this silkie printing method yourself and see what you come up with. It just might be something that you will love!


TTFN